Thebattery aging cabinet is a special equipment that simulates the battery charge and discharge cycle, screens aging batteries with degraded performance, and verifies the long-term reliability of the battery. Here's how to do it:
1. Pre-operation preparation: safety and equipment inspection
Before operation, it is necessary to check the equipment, battery and environmental hazards to ensure the safety of the test foundation.
Environmental preparation
The place should be well ventilated (to avoid the accumulation of combustible gases in confined spaces, especially for lithium batteries), the temperature should be controlled at 15-30°C, and the humidity should be ≤ 60% (to prevent short circuits from moisture).
Remove debris in the operation area, stay away from fire, water and corrosive substances, and equip dry powder fire extinguishers (clean water is prohibited in the event of a lithium battery fire).
Equipment inspection
Appearance: Check that the cabinet shell is not damaged, the cooling fan (or heat dissipation hole) is not blocked, and the emergency stop button and power switch are flexible and effective.
Wiring: Confirm that the power cord and charging and discharging cable (meter pen/terminal) of the device are not damaged or exposed, and the terminal is not loose or oxidized.
Software: Open the device control computer and check whether the aging test software (such as BTS series test software) starts normally without error prompts.
Battery check
Screen the battery to be tested: Make sure the battery model and nominal voltage/capacity are consistent (avoid mixing tests leading to confusion in parameters), and there is no bulging, leakage, or damage in appearance (such batteries are prohibited from testing and are prone to explosion).
Pre-test: Use a multimeter to measure the initial voltage of the battery, confirm that there is no short circuit (voltage is 0 or abnormally low), no over-discharge (such as lithium battery voltage < 2.75V), and the initial state is normal before it can be put into testing.
Personnel protection
Wear insulated gloves (to prevent electric shock), goggles (to prevent battery leakage or explosive splashes), long hair should be tied up, and loose clothing is not allowed (to avoid getting caught in the equipment).
2. Start-up and parameter setting: match the battery characteristics
Parameter setting is the core link, which needs to be accurately configured according to the nominal characteristics of the battery type (such as lithium battery, lead-acid battery, nickel-metal hydride battery) to avoid damage to the battery/equipment due to incorrect parameters.
Device boot order
Close the main power switch of the device (usually on the side or back of the cabinet) and wait for the device to self-test (some devices will have an indicator light or screen prompting "self-test passed").
Start the control computer, open the aging test software, and log in to the operation account (it is recommended to use a permission account to prevent accidental changes in parameters).
Select "Device Connection" in the software to confirm that the aging cabinet communicates normally with the computer (such as "connected" and "channel online").
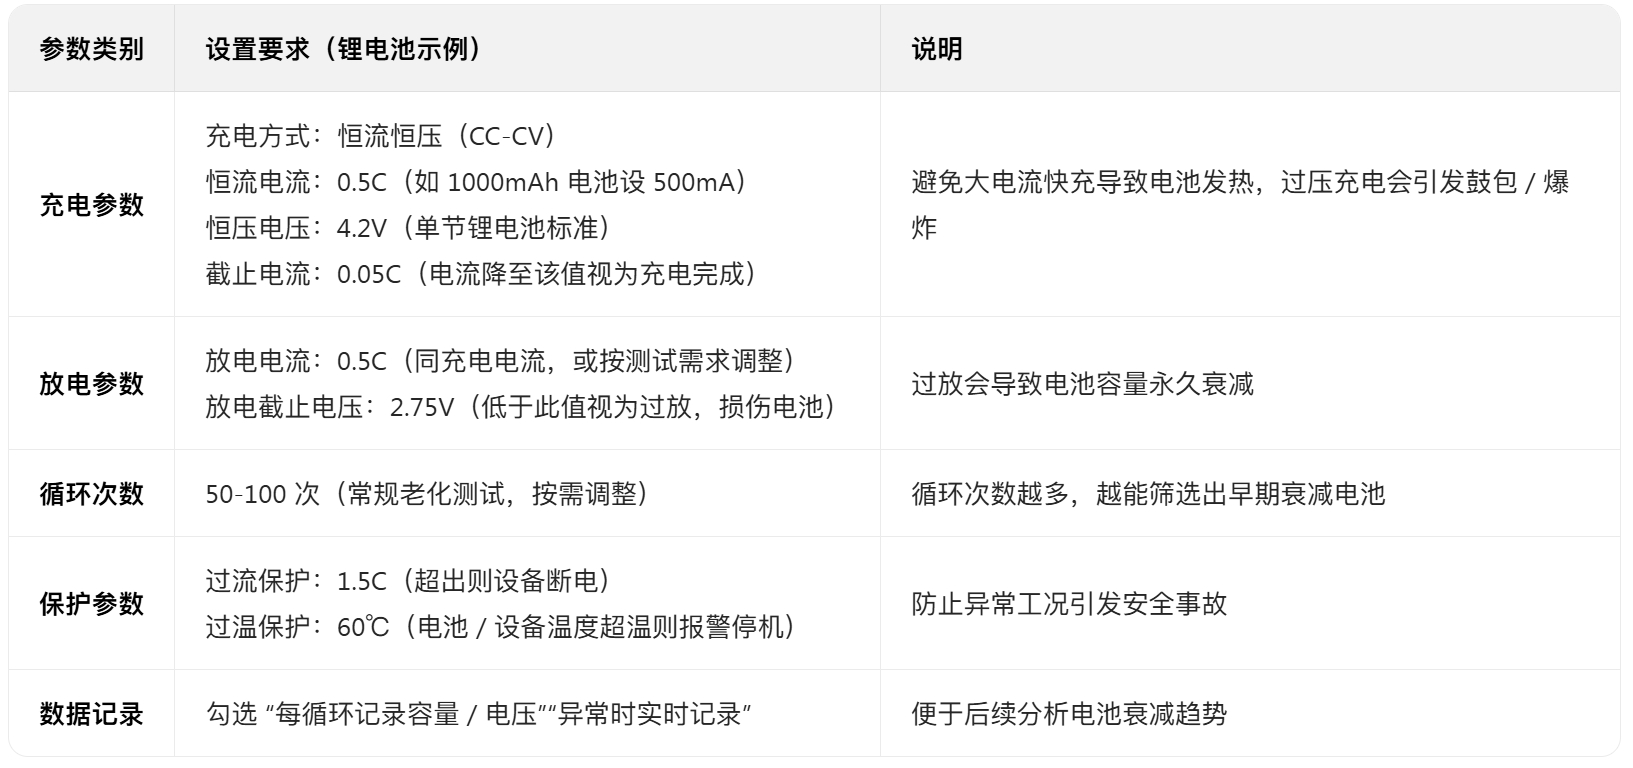
Core parameter settings (taking lithium batteries as an example) Go to the "Test Scheme Edit" interface of the software and set the following key parameters (strictly match the battery specification):
Save and recall the scheme
After the parameter setting is completed, click "Save Scheme" (naming format: battery model + test type, such as "18650 - Cyclic Aging"), and subsequent similar tests can be directly called to avoid repeated settings.
3. Battery clamping: Make sure the wiring is correct
Clamping is a key step to avoid short circuit and poor contact, and it needs to be operated according to the principle of "channel correspondence, positive and negative poles".
Channel selection
The burn-in cabinet is usually multi-channel (e.g., 16 channels, 32 channels), select the free channel (display "unoccupied") in the software, record the channel number (e.g., "channel 1 - channel 10") to avoid conflicts with other test tasks.
Wiring operation
Take out the charging and discharging connection cable of the corresponding channel (red meter pen is the positive electrode, black meter pen is negative), and confirm that the meter pen terminal is not oxidized (it can be slightly polished with sandpaper to ensure good contact).
Put the battery into a special fixture (or mount), connect the positive terminal to the red meter pen, and the negative terminal to the black meter pen, and gently press the clamp to ensure that the battery is not loose (poor contact will cause the test data to fluctuate, and even trigger an overcurrent alarm).
When testing multiple channels, the records are recorded one by one by "Channel Number - Battery" (e.g., "Channel 1:18650-001") to avoid subsequent confusion.
Wiring inspection
Gently pull the pen with your hand to confirm that it does not fall off; Check the "channel status" in the software and confirm that each channel is "wired normally" (there is no "positive and negative reverse connection" or "poor contact" prompt), if the prompt is abnormal, immediately power off and rewire.
4. Start testing and process monitoring
After starting, it is necessary to monitor the status of the equipment and battery in real time, and deal with abnormalities in time to ensure test safety.
Test start
Select the channel of the clamped battery in the software, click "Start Test", the "Parameter Confirmation" window will pop up, check the charge/discharge voltage, current, and cycle number again, and click "Confirm" after confirming that it is correct.
Observe the equipment indicator: after starting, the channel indicator becomes "running" (usually green) and the no alarm light (red) illuminates; At the same time, check the real-time data of the software to confirm that the charging current/voltage is running stably according to the set value (such as constant current at the beginning of charging, and the voltage gradually increases).
Real-time monitoring (core link)
Inspect every 15-30 minutes and focus on:
Battery status: Touch the surface of the battery with your hands (need to wear insulating gloves) to feel whether the temperature is normal (≤ 45°C, lithium batteries need to be vigilant if they exceed 50°C), and there is no bulge or leakage.
Device data: View real-time curves (current-time, voltage-time) in the software, and immediately suspend the test if there is a sudden current rise/drop, abnormal voltage fluctuations (such as voltage suddenly exceeding 4.3V during charging).
Alarm handling: If the device triggers an alarm (red light on + buzzer sound), click "Pause Test" to check the alarm reason (software prompts "overcurrent", "overtemperature", "positive and negative pole reverse", etc.):
Overcurrent/Overtemperature: Check whether the wiring is loose or the battery is short-circuited when the power is off, and restart the test after elimination.
Reverse connection of positive and negative poles: immediately power off, change the polarity of the meter pen, and start after rechecking;
Battery bulge: stop the test immediately, take out the battery when the power is cut off, put it in the explosion-proof box, and prohibit further use.
Data logging
During the test, the software automatically records data and can periodically (e.g. every 10 cycles) export data reports (Excel format) to analyze battery capacity decay (e.g., 1000mAh in the 1st cycle, 900mAh in the 50th cycle, and 10% attenuation rate).
5. Test completion and follow-up treatment
After the test is completed, it is necessary to standardize the finishing to ensure the proper handling of the equipment, battery and data.
Stop testing
When the test reaches the set number of cycles, the software will automatically prompt "Test Complete", the channel indicator will change to "Complete" (usually blue), click "Stop Test", and turn off the charge and discharge output of the channel.
If you need to stop midway (such as device failure, battery abnormality), click "Emergency Pause" and then disconnect the main power supply of the device (do not unplug the power cord directly).
Battery removal and sorting
After the power is cut off, remove the batteries of each channel in turn with insulated gloves, and measure the battery terminal voltage with a multimeter (confirm that there is no overcharge/over-discharge).
Classification by test results:
Qualified battery: capacity attenuation rate ≤10%, no abnormal appearance, marked and then reserved;
Aging battery: capacity attenuation rate > 20%, performance is not up to standard, and it is recycled according to the specifications of waste batteries after marking;
Faulty battery: bulging, leaking or short circuit, put it in an explosion-proof box separately and contact a professional institution for disposal (it is forbidden to discard it at will).
Device and data finishing
Cleaning equipment: unplug all channel connecting wires, tidy up the meter pen, wipe the surface of the cabinet and fixtures with a dry cloth to remove dust;
Data storage: Export all test data (including reports and curves) and name and archive them according to "date + battery model" for easy follow-up traceability.
Shutdown sequence: turn off the aging test software→ turn off the control computer→ disconnect the total power supply of the equipment→ turn off the power supply of the site distribution box.
6. Core safety precautions (must-see)
It is forbidden to open the cabinet protective door when the equipment is running (there is a high-voltage circuit inside, which is easy to be electrocuted);
It is forbidden to test damaged, bulging or leaking batteries (which are prone to explosion or electrolyte corrosion of equipment);
If the battery smokes or catches fire during the test, immediately press the "emergency stop button", disconnect the main power supply, and extinguish the fire with a dry powder fire extinguisher (carbon dioxide or water is prohibited for lithium battery fire);
Operators need to be trained to take up their posts, be familiar with the meaning of equipment alarm codes and emergency treatment procedures, and prohibit unlicensed personnel from operating;
Before the daily test, check whether the emergency stop button and over-temperature protection function are normal (simulated trigger test) and maintain the terminal block and heat dissipation system of the equipment every month.
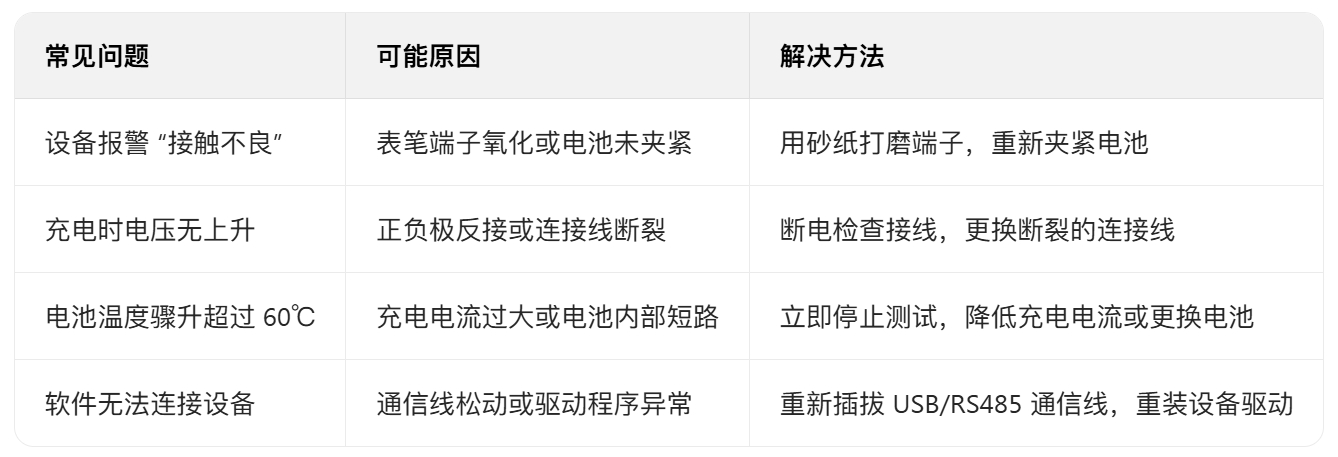
Common problems and solutions
In short, the core of the operation of the battery aging cabinet is "check first, then set, monitor diligently, and finish well", and it is necessary to adjust the details in combination with the specific equipment manual and battery specification to ensure test safety and accurate data.